/ Next post
8 April, 2026


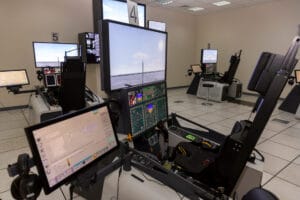
The closer your lab gets to a real-world environment, the more moving parts you introduce – sometimes literally.
That’s especially true in simulators, cockpits, and control rooms, where tasks unfold across multiple screens.
These setups are built to reflect how people actually work. But for eye tracking, they sometimes introduce more challenges: blind spots, calibration drift, and cross-screen gaze data that doesn’t quite hold together.
It’s not that eye tracking can’t handle complex setups. But in multi-screen setups, the margin for error gets smaller. And the number of things that can reduce data quality gets a lot bigger.
These are some things many researchers underestimate when building multi-screen studies, and what it takes to make the setup work both visually and scientifically:
In complex lab environments, screens rarely sit in neat rows. They wrap around cockpits, curve across simulator dashboards, or tilt toward the participant from different heights. That’s great for realism, but it can complicate how eye tracking systems interpret space.
Most eye tracking systems rely on a known relationship between the participant, the screen surface, and the camera. When monitors are angled differently, spread across curved surfaces, or mounted at uneven heights, that relationship gets harder to maintain. Even small mismatches can lead to warped gaze maps or zones where accuracy drops off.
What helps:
• Flatten the layout when possible.Aligning screens on a shared plane can reduce mapping issues and make calibration more stable.
• Use systems that support 3D spatial mapping. These systems are built to handle curved or angled setups, especially in immersive simulators.
• Avoid mixing screen heights or tilt angles unless your system accounts for it. Consistency makes it easier to maintain accuracy across displays.
In multi-screen studies, eye tracking data often behaves differently across displays than it does on a single screen.
Even when each screen is well-calibrated on its own, gaze points can misfire in the transitions. Fixations may appear jittery or cut short, while saccades between screens might get stretched or misplaced.
If your analysis depends on those transitions – say, measuring reaction time between a central alert and a side-screen task – you’ll want to test them directly.
What helps:
• Use fixed targets across displays. Check whether gaze coordinates land where expected, especially near monitor edges or corners.
• Validate saccades and transitions. Don’t just review screen-specific metrics. Look at how gaze moves across the full field of view.
• Account for off-screen elements. In cockpit or control-room setups, gaze might land on hardware, indicators, or physical controls. Make sure your mapping includes those areas or clearly defines where tracking drops out.
Multi-screen studies often ask more of participants than typical single-display setups do. Their attention is divided, and calibration targets don’t always land where you’d expect them to.
The process may look familiar on paper but in practice, it’s far more sensitive to variation.
A participant who sits slightly off-center, for instance, might drift out of optimal tracking range on the far edges. Or, if one eye is partially blocked – by glare, makeup, or the rim of a pair of glasses – systems that calibrate both eyes together may still pass, even though the data won’t hold up.
What helps:
• Use calibration targets that reflect your actual screen layout. Don’t rely on a generic 9-point grid if your task space spans multiple viewing planes.
• Validate with visual stimuli before the study begins. After calibration, show participants fixed targets and confirm that gaze data aligns accurately.
• Allow for per-eye calibration and feedback. Problems with one eye can skew data without being obvious in real time.

Spatial planning is an important part of the study design. And in multi-screen environments, it’s where a lot of issues can be prevented.
If your system supports 3D gaze output or includes a world model, it’s worth mapping out how each screen is represented and how the cameras interact with that space. Which displays are visible to which cameras? How are the surfaces defined in the software?
If those pieces don’t align with the physical setup, your gaze data will reflect it. And it’s much easier to adjust things before anything’s mounted or hardwired.
What helps:
• Start with a spatial map. Plot the expected gaze zones and targets in 3D, especially if you’re working with angled, curved, or offset screens.
• Align virtual and physical geometry. Use your system’s configuration tools to make sure the camera layout matches the physical environment.
• Use dummy runs to validate. Before adding participants, run tests with known targets to verify mapping across all displays.
Some eye tracking systems require you to design around their limitations, using flat screens, tighter viewing angles, and less variation. But if your setup is built to reflect the real world, your eye tracker should be too.
Smart Eye Pro supports complex layouts by design: angled screens, multi-level displays, shared coordinate spaces, and dynamic 3D mapping. That means fewer compromises for your study and more reliable data across the full field of view.
If you’re designing a study in a multi-screen environment and want to sense-check your setup – or talk through what your system needs to perform reliably – get in touch with us. We’re happy to help.
